
Full-Stack 개발자가 되려는 작은 개발자의 블로그
HTML5 기초 실습5 본문
문자 선택자
| ::first-letter | 첫 번째 문자를 선택한다. |
| ::first-line | 첫 번째 라인을 선택한다. |
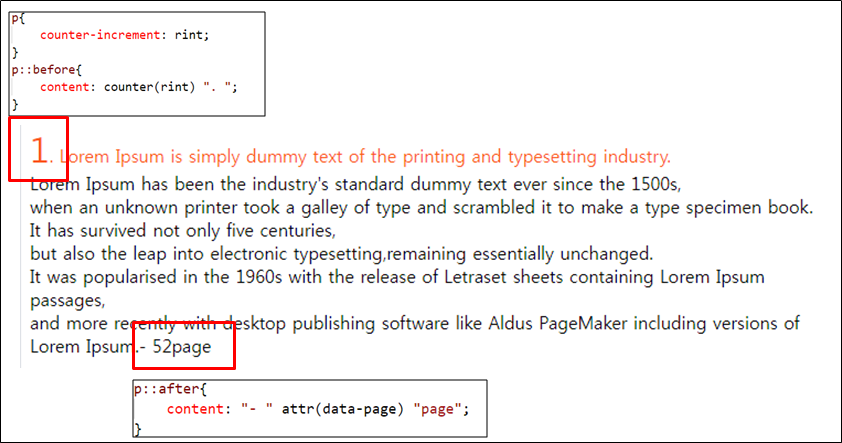
| ::before | 요소의 이전에 스타일을 적용한다. |
| ::after | 요소의 다음에 스타일을 적용한다. |
<h2>Lorem Ipsum</h2>
<p data-page="52">
    Lorem Ipsum is simply dummy text of the printing and typesetting industry. <br>
    Lorem Ipsum has been the industry's standard dummy text ever since the 1500s,<br>
    when an unknown printer took a galley of type and scrambled it to make a type specimen book.<br>
    It has survived not only five centuries, <br>
    but also the leap into electronic typesetting,remaining essentially unchanged.<br>
    It was popularised in the 1960s with the release of Letraset sheets containing Lorem Ipsum passages,<br>
    and more recently with desktop publishing software like Aldus PageMaker including versions of Lorem Ipsum.</p>

    <p data-page="273">
    Contrary to popular belief, Lorem Ipsum is not simply random text.<br>
    It has roots in a piece of classical Latin literature from 45 BC,<br>
    making it over 2000 years old. Richard McClintock, a<br>
    Latin professor at Hampden-Sydney College in Virginia, looked up one of the more obscure Latin words, <br>
    consectetur, from a Lorem Ipsum passage, <br>
    and going through the cites of the word in classical literature,discovered the undoubtable source. <br>
    Lorem Ipsum comes from sections 1.10.32 and 1.10.33 of "de Finibus Bonorum et Malorum" <br>
    (The Extremes of Good and Evil) by Cicero, written in 45 BC.<br>
    This book is a treatise on the theory of ethics, very popular during the Renaissance. <br>
    The first line of Lorem Ipsum, "Lorem ipsum dolor sit amet..", comes from a line in section 1.10.32.
</p>
p{
counter-increment: rint;
}
p::before{
content: counter(rint) ". ";
}
p::after{
content: "- " attr(data-page) "page";
}
p::first-letter{
font-size: 2em;
}
p::first-line{
color: rgb(252, 87, 27);
}
/* 드래그 시 변화 */
p::selection{
background-color: black;
color: rgb(255, 74, 74);
}
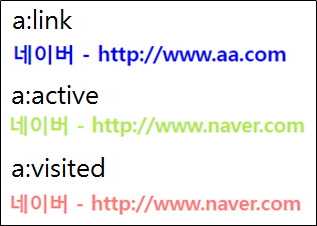
연결(Anchor) 선택자
| :link | a 태그의 기본 상태를 선택 |
| :visited | a 태그의 방문 후 상태를 선택 |
| :active | a 태그를 눌렀을때 상태를 선택 |
<h3>Nothing</h3>
<h3><a href="http://www.naver.com">네이버</a></h3>
a{
text-decoration: none;
}
a:visited{
color: rgb(252, 125, 125);
}
a:link::after{
content: " - "attr(href);
}
a:active{
color: rgb(182, 231, 84);
}
부정 선택자(not)
- 해당 태그가 아닌 태그들을 선택한다.
<input type="text" name="" id=""> <br>
<input type="password" name="" id=""><br>
<input type="text" name="" id="">
input:not([type="password"]){
background-color: rgb(229, 229, 255);
}
content
- 실제 내용이 표현되는 곳
주요 속성
▶ 가로세로 지정 : width(너비)/height(높이)
▶ 가로세로 최소/최대값 지정 : min-, max-
▶ 단위 : pixel(px), percent(%)
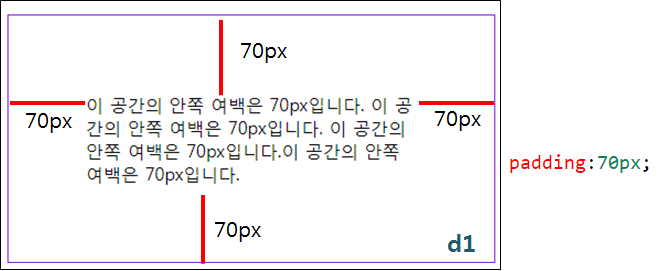
padding
- 내부(안쪽) 여백을 설정
- 고정 단위(px, pt, cm)
- 지정하지 않을 경우 auto(브라우저 기본값)로 설정
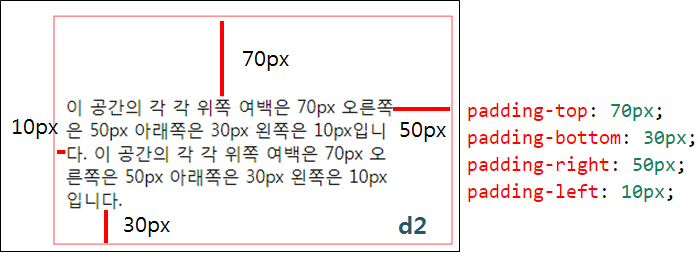
방향별 여백 설정
| padding-top | 위쪽 여백 |
| padding-right | 오른쪽 여백 |
| padding-bottom | 아래쪽 여백 |
| padding-left | 왼쪽 여백 |
<div class="d1">
이 공간의 안쪽 여백은 70px입니다.
이 공간의 안쪽 여백은 70px입니다.
이 공간의 안쪽 여백은 70px입니다.이 공간의 안쪽 여백은 70px입니다.
</div>
<div class="d2">
이 공간의 각 각 위쪽 여백은 70px 오른쪽은 50px 아래쪽은 30px 왼쪽은 10px입니다.
이 공간의 각 각 위쪽 여백은 70px 오른쪽은 50px 아래쪽은 30px 왼쪽은 10px입니다.
</div>
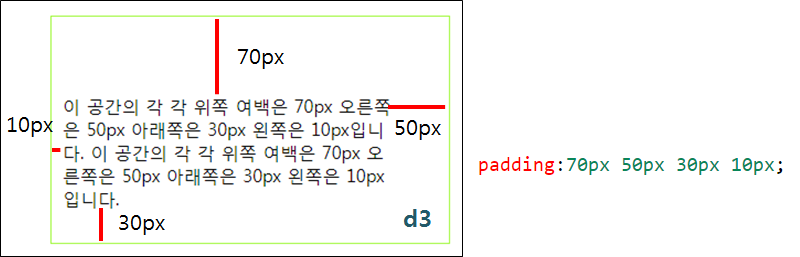
<div class="d3">
이 공간의 각 각 위쪽 여백은 70px 오른쪽은 50px 아래쪽은 30px 왼쪽은 10px입니다.
이 공간의 각 각 위쪽 여백은 70px 오른쪽은 50px 아래쪽은 30px 왼쪽은 10px입니다.
</div>
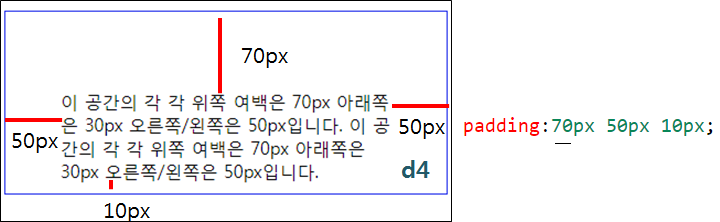
<div class="d4">
이 공간의 각 각 위쪽 여백은 70px 아래쪽은 30px 오른쪽/왼쪽은 50px입니다.
이 공간의 각 각 위쪽 여백은 70px 아래쪽은 30px 오른쪽/왼쪽은 50px입니다.
</div>
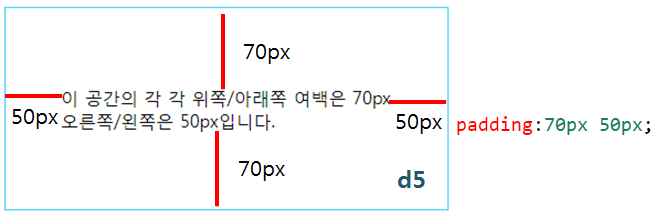
<div class="d5">
이 공간의 각 각 위쪽/아래쪽 여백은 70px 오른쪽/왼쪽은 50px입니다.
</div>div{
width: 300px;
}
.d1{
padding:70px;
border: blueviolet 1px solid;
}
.d2{
padding-top: 70px;
padding-bottom: 30px;
padding-right: 50px;
padding-left: 10px;
border: rgb(255, 112, 119) 1px solid;
}
.d3{
padding:70px 50px 30px 10px;
/* padding:70px 50px 10px; >50px가 좌우 같은 값으로 설정 */
/* padding:70px 10px; >70px가 상하 같은 값, 10px가 좌우 같은 값으로 설정 */
border: rgb(164, 248, 67) 1px solid;
}
.d4{
padding:70px 50px 10px;
border: rgb(36, 49, 235) 1px solid;
}
.d5{
padding:70px 50px;
border: rgb(55, 208, 255) 1px solid;
}
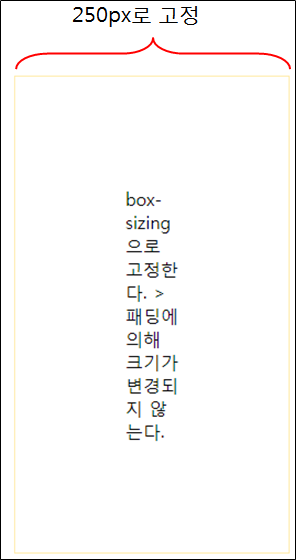
box-sizing
- 박스의 크기 설정
- border-box - width + (2 * margin)
- content-box - width + 2 * (margin + border + padding)
- ::border-box는 보이는 영역의 크기에 padding을 제외하여 width에 설정한 크기로 고정
- content-box가 기본값(생략 가능)
<div class="d6">
    box-sizing으로 고정한다. > 패딩에 의해 크기가 변경되지 않는다.
</div>
.d6{
padding : 100px;
border: rgb(255, 236, 174) 1px solid;
width: 250px;
box-sizing: border-box;
}
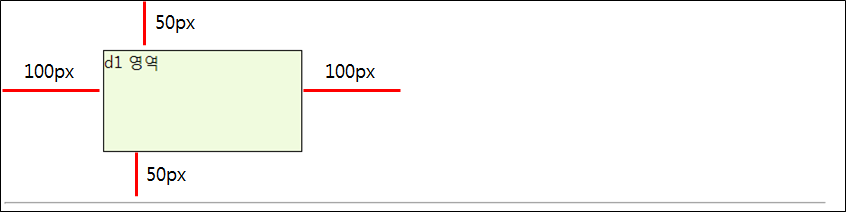
margin
- top, right, bottom, left 순으로 설정
| margin-top | 위쪽 바깥 여백 |
| margin-right | 오른쪽 바깥 여백 |
| margin-bottom | 아래쪽 바깥 여백 |
| margin-left | 왼쪽 바깥 여백 |
<div id="d1">d1 영역</div>
#d1{
    width: 200px;
    height: 100px;
    margin: 50px 100px;
    background-color: rgba(172, 231, 77, 0.185);
    border: 1px solid black;
}
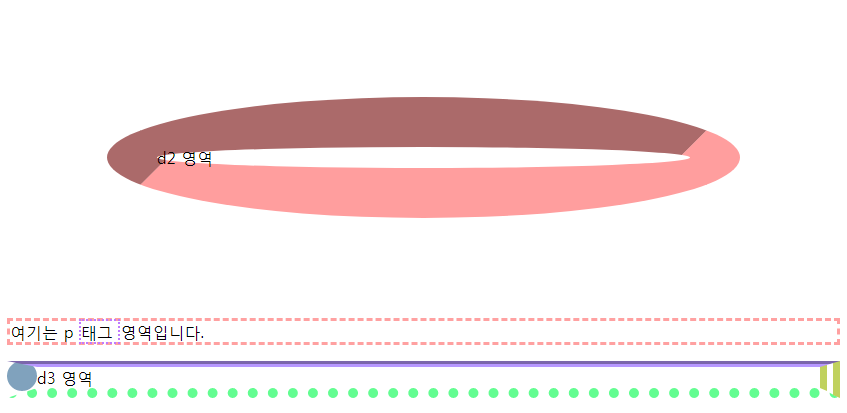
border
- border-style
▶ solid(실선)
▶ dashed(파선)
▶ dotted(점선)
▶ double(이중선)
▶ groove(오목선)
▶ ridge(볼록선)
▶ inset(오목공간)
▶ outset(볼록공간)
<div id="d2">d2 영역</div>
<p>여기는 p <span>태그 </span>영역입니다.</p>
<div id=d3>d3 영역</div>
#d2{
border-width: 50px;
border-color: rgb(255, 158, 158);
border-style: inset;
border-radius: 50%; /* 도형의 라운드 쇼ㅗㄱ성 */
margin: 100px;
}
#d3{
border-bottom: 10px dotted rgb(99, 253, 145);
border-right: 20px double rgb(192, 209, 94);
border-top: 6px groove rgb(183, 152, 255);
border-left: 30px dotted rgb(128, 162, 189);
}
'강의 정리 > HTML_CSS_JS' 카테고리의 다른 글
| HTML5 기초 실습4 (0) | 2020.05.14 |
|---|---|
| HTML5 기초 실습3 (0) | 2020.05.13 |
| HTML5 기초 실습2 (0) | 2020.05.12 |
| HTML5 기초 실습1 (0) | 2020.05.11 |
| HTML 기본 태그 (1) | 2020.03.01 |
'강의 정리/HTML_CSS_JS' Related Articles
more


Comments